How photo magnets are made, step by step
A pressed photo magnet is assembled in one press stroke. The photo print sits face up on a steel shell, a clear mylar disc covers it, and the press folds the shell rim over both. A flat ferrite magnet is glued to the back. Finished thickness is about 4 mm.
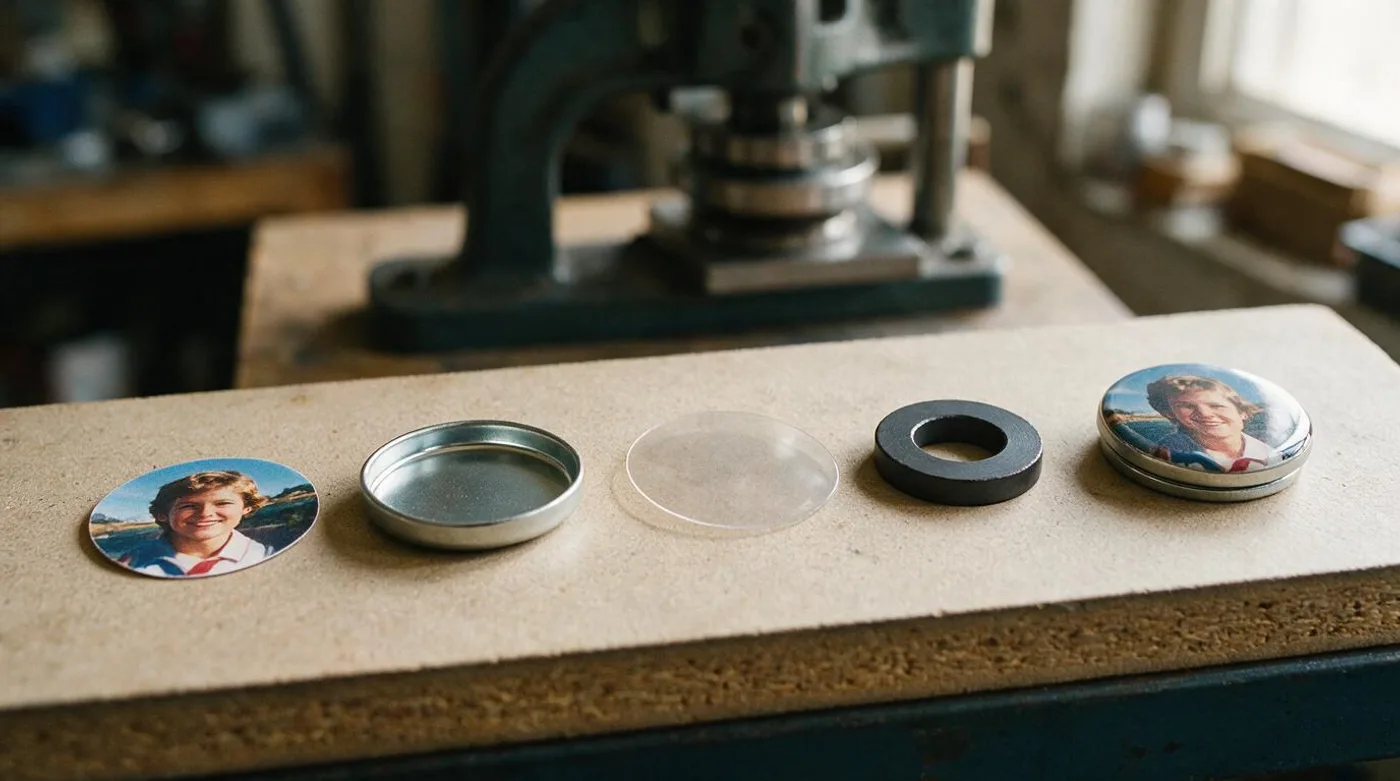
Four layers, about 4 mm of total thickness, and roughly one second of press time. That is the whole of a pressed photo magnet, and the reason one holds several times what a printed sheet of the same footprint manages, 110 g at best on bare steel, is entirely down to what those four layers are.
Printing and cutting the image
The image is printed on photo paper rather than on the magnet. That single decision is what separates the pressed route from everything else, because it lets the factory use a paper stock chosen for color and gloss instead of whatever surface a magnetic material happens to offer. Color work, resolution and ink choices are the same problems any photo lab has, and printing methods covers those trade-offs.
Prints are laid out several to a sheet with the image extended past the trim line. That extension matters more here than on a flat print, because the finished magnet wraps its print over a curved shoulder and down into the rim, so anything the customer wants to see has to sit well inside the visible face. A face that is 57 mm across needs a printed disc noticeably larger than 57 mm, and the difference disappears into the crimp.
Cutting is done with a die on a press, one cut per piece or several at a time from a stacked pile. The die is matched to the shell size, so a 2.25 in round shell has a round die, a 2.5 x 2.5 in square shell a square one with the correct corner radius, and a 2 x 3 in rectangle its own. Custom shapes need custom tooling, which is why unusual sizes are quoted separately when they are offered at all.
The shell, the mylar and the press
The steel shell is a shallow stamped cup with a lip standing proud of the face. It does three jobs at once. It gives the magnet its shape and its rigidity, it provides the metal that the rim is folded from, and it puts a flat, stiff plate directly behind the print so the whole face sits true against the door instead of bowing.
The mylar is a clear polyester disc cut to the same outline as the print. It goes on last, over the image, and it is the reason a pressed magnet survives a kitchen. Mylar takes wet hands, cooking splashes and a cloth, and it blocks a good deal of the light that would otherwise reach the ink. A print under mylar is a different proposition from a print exposed to the room, which is the main argument in pressed against magnetic sheet.
Assembly is a stack in a die set. The operator drops the shell into the lower die face down, lays the print in image side out, lays the mylar over it, and brings the upper die down. The press rolls the standing lip of the shell inward and flattens it, trapping the mylar and the print edge under folded steel all the way around. There is no adhesive holding the front together, only that fold. Bench versions of the same press, hand operated with a lever, put the process within reach of anyone making magnets at home from the same parts.
The magnet on the back
A flat ferrite magnet is bonded to the rear of the shell, usually with a pressure-sensitive adhesive disc applied by machine. Ceramic ferrite is the sensible choice at this size. It is cheap, it is not going to corrode, it survives being dropped better than plated neodymium, and it does not need to be strong. A photograph weighs almost nothing, so the disc is sized for the print rather than for a load, and a neodymium back would put a magnet on the door that a child could not remove and an adult would struggle to lift off cleanly.
The magnet is also the part that decides how the finished piece feels in the hand. It carries most of the weight, and its flat back is the surface that meets the paint. That is why the rim matters for door care as much as for looks, and why do magnets damage fridges spends time on the crimped edge.
What the checks catch
Inspection on this kind of line is visual and quick, because the faults are visible if you know the four to look for. Someone tilts the face to a light to catch specks under the mylar, looks at the border for even width, runs a thumb round the rim, and tries the back magnet for movement. Batches are usually checked by sampling rather than piece by piece, so a small run and a large run can differ in how much gets seen.
The flexible sheet route, which is a different animal
Sheet magnets skip most of the above. The base is magnetic vinyl: ferrite powder mixed into a vinyl binder and calendered into a continuous sheet, 0.5 to 0.75 mm thick for print work, with a surface field of about 300 Gauss. One face is often supplied with a white coating so it can be printed directly.
From there the shop takes one of two paths. It prints the image straight onto the coated face on a flatbed or roll-fed press, or it prints on paper or film and laminates that print onto the sheet with an adhesive layer, sometimes with a clear laminate over the top for protection. Then the whole roll or sheet goes through a die cutter or a plotter with a drag knife, which cuts the outline and leaves the waste to be stripped away.
The result is thin, light, cheap, and weak. A 0.5 mm sheet at 50 x 50 mm holds 60 g on bare steel and a 0.75 mm sheet holds 110 g, and both figures drop again on a painted door. It is a perfectly good way to make a calendar or a takeaway menu magnet, and a poor way to make something that has to hold a stack of paper. The print is the other half of that. We estimate a laminated inkjet print on sheet shifts color visibly in two to three years on a door that gets sun, against about a decade indoors for a print sealed under mylar in a crimped steel shell, and both figures are estimates from the construction rather than measurements. How long magnets last sets out where they come from.
| Pressed shell | Flexible sheet | |
|---|---|---|
| Print goes on | Photo paper, then into the shell | The vinyl itself, or a film laminated to it |
| Protection | Clear mylar under a folded steel rim | Nothing, or a clear laminate |
| Magnet | Flat ceramic ferrite disc, glued to the shell | The vinyl body itself, ferrite powder in binder |
| Total thickness | About 4 mm | 0.5 to 0.75 mm plus print |
| Holds at 50 to 57 mm | Several times the sheet figure, none published | 60 to 110 g |
| Tooling per shape | A die set and matching shells | A cutting die or a knife plotter path |
| Typical failure | Rim lift, dust under mylar | Print fading, edges curling |
| Cost per piece | Higher | Lower |
Four faults and how to find each by hand
Misregistration shows as an uneven border. The print sat off center in the die, so the rim eats more of the image on one side than the other. Look at the four borders of a square magnet, or turn a round one slowly and watch the crimp width. A millimeter of drift is invisible on a landscape and obvious on a photograph with a face near the edge.
Trapped dust looks like a dark speck or a hair sealed under the gloss. It arrives between the print and the mylar during stacking, and nothing can be done about it afterwards. Hold the magnet so a window reflects off the face at a shallow angle, which throws every inclusion into relief. A speck in a sky is a reject; a speck in a dark corner is a shrug.
A lifting rim is the fault that ends the magnet's life. If the press did not fold the lip fully, or the stack under it was too thick, one section of steel stands slightly proud. Run a fingernail all the way round the back edge and listen as much as feel for the catch. Once a rim lifts, the mylar frees itself at that point, and after that the print takes water at the edge and browns.
Weak adhesive on the back shows up as a ferrite disc you can rotate with your thumb. Push and twist, gently. Any movement means the bond is partial, and a magnet that arrives with a movable back tends to be the one whose magnet stays on the fridge while the picture falls on the floor. If several magnets from the same order behave that way, the fault is the batch rather than the piece, and it is worth saying so when you ask for replacements.
Frequently asked
What are the layers in a pressed photo magnet?
Four layers sit front to back, starting with the clear mylar cover, then the photo print, the crimped steel shell, and the flat ferrite magnet. The whole stack runs about 4 mm thick, and the solid ferrite disc at the back is what does the holding.
How is a flexible photo magnet different?
There is no shell and no press. The print is either laminated onto magnetic vinyl or printed straight onto its white-coated face, then die cut. The magnet layer is 0.5 to 0.75 mm and holds 60 to 110 g at 50 x 50 mm.
How can I tell a badly made pressed magnet?
Run a fingernail around the rim for lift, tilt the face to a window to catch dust specks trapped under the mylar, check the border width on all four sides for misregistration, and try to twist the ferrite disc on the back.
Why does a pressed magnet hold so much more than a sheet magnet?
The ferrite disc behind the print is thick, solid ceramic, while a flexible sheet is ferrite powder diluted in vinyl at 0.5 to 0.75 mm. Several times the magnetic material sits behind the same 50 mm of print. No seller publishes a pull force for the pressed build, so we leave that comparison without a number.